
Note: Follow the instructions below to configure the Email Manager option to use a Google® mail server to send emails from the various areas of the School Accounting System.
1. From the main School Accounting System screen, select the Maintenance menu and then Email Manager.
2. Click the General Options tab.
3. Select the Enable Email Manager field if it is not already selected.
4. Leave the Use Hosted Mail Server field unselected.
5. Complete the General Information section as follows:
Select the Enable SSL field.
Enter smtp.gmail.com in the Mail Server field.
Enter 587 in the Port Number field.
Complete the Email Message Font, Disclaimer Font, and Disclaimer fields as desired.
Leave the Directory (Tenant) ID, Application (Client) ID, Client Secret Value, and Authority fields blank. (Tip: These fields are not shown in the diagram below, but do display on the screen below the Disclaimer field.)
Select the Send Emails in Groups field.
Enter 75 in the Number of Emails per Group field.
Enter 1 in the Pause Between Groups (Minutes) field.
6. Click the Save button.
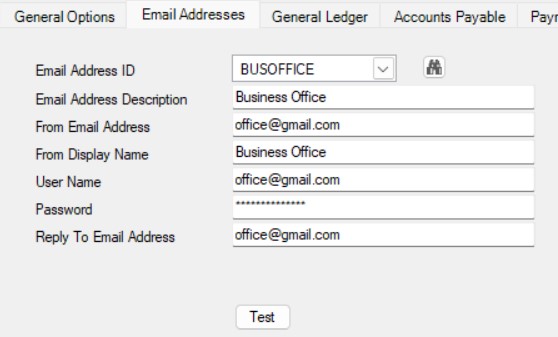
7. Click the Email Addresses tab to set up the appropriate email addresses.
Complete the Email Address ID, Email Address Description, From Email Address, From Display Name, and Reply To Email Address fields as desired.
Enter the full email address of the account being used to send the emails (for example, username@gmail.com) in the User Name field.
Enter the password used to access the specified Gmail account in the Password field.
Note: If the account being used to send emails utilizes Google’s 2-Step Verification (https://www.google.com/landing/2step/), complete the additional steps under the Configuring the Password for Google’s 2-Step Verification section (below) to properly configure the password for use within the Email Manager option. If the account being used to send emails does not use Google’s 2-Step Verification, ensure the Allow less secure apps setting in the Sign-in & security area is set to ON.
Click the Save button.
Configuring the Password for Google's 2-Step Verification
Tip: If you are unsure if your email address is set up with 2-Step Verification, this can be verified by viewing your Google security settings at https://myaccount.google.com/. If prompted, log into your Google mail account. Once on the Account Settings, the 2-Step Verification field will indicate that it is On or Off. If it indicates that it is on, continue with the following steps to generate an App Password and save it in the School Accounting System.
Go to the App Passwords section of your account settings: https://security.google.com/settings/security/apppasswords.
Select Other (Custom name) from the Select App drop-down box.
Enter School Accounting System in the field that appears and then click the Generate button.
Copy the password that is generated.
In the School Accounting System, enter this newly generated password in the Password field for the appropriate Email Address ID within the Email Manager option (see Step 7 above).