Note: The instructions below are used as part of the Wyoming Retirement Report Setup Procedures to import a file (downloaded from within the Wyoming RAIN system) containing the employee RAIN IDs into the Employee RAIN ID custom field in the School Accounting System by using the Import Custom Fields option. The instructions below use the exact specifications of the file downloaded from the RAIN system.
From the Payroll screen, select the Maintenance menu and then Employees.
At the Employees screen, select the Options menu, Import, and then Import Custom Fields.
A screen will appear prompting for the specific custom field in which to have the data imported; double-click on the Employee RAIN ID custom field.
On the Import Custom Fields screen, enter the correct path (drive and folders) and file name for the file to be imported in the File Name field, or click the Search button to select the correct path and file.
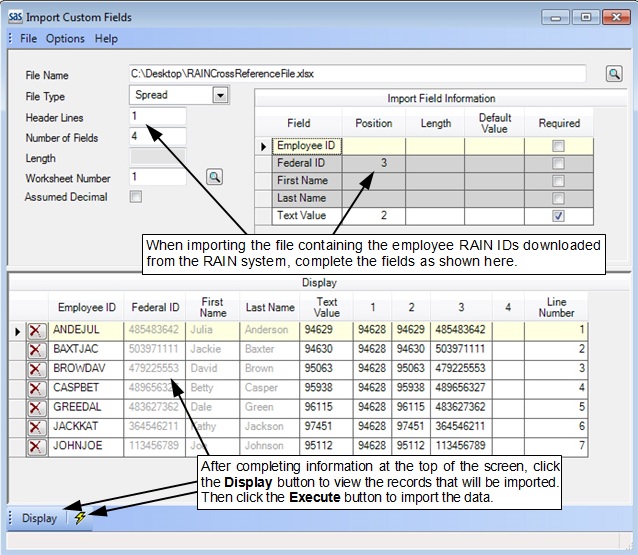
Enter Spread in the File Type field, or click the down-arrow button to select it. See the diagram below.
Enter 1 in the Header Lines field.
Enter 4 in the Number of Fields field.
The Length field will be disabled and left blank.
Enter 1 in the Worksheet Number field.
Leave the Assumed Decimal field unselected.
Complete the Import Field Information section as follows:
Enter 3 in the Position field (column) for Federal ID.
Enter 2 in the Position field (column) for Text Value.
Click the Display button to view the information (records) from the file that will be imported according to the specified import settings.
Note: If a record contains invalid data for a field, an error icon will appear in the row by the invalid item in the Display List; make the necessary corrections for the record by keying in the correct information or clicking the down-arrow button, if applicable, to select a valid ID. All records (lines) with errors must be corrected or deleted before the file can be imported. To remove a record that should not be imported, click the Delete button located to the left of the desired record; when prompted, click Yes to delete the row. To remove all records with errors, complete the Delete Rows with Errors option. If changes are made in the Display List, do not select the Display button again; otherwise, the screen will refresh with the data from the import file and all changes will be lost. When importing a spreadsheet file, all the data included in the fields in the file to import, along with a line number, will appear at the end of each record in the Display List under the applicable field number (only for those fields designated to import as specified in the Number of Fields field).
Click the Execute button to continue the import.
Once the file has been imported, the number of records imported will appear in the status bar; click the X in the upper right-hand corner to close the screen.
Note: If there were records that did not import, contact Customer Support for assistance.